(Created page with "alt=user tools menu in UltraEdit|right <div class="idm-shortcut"> Shortcut: <span>Ctrl+Shift+#</span> ''(where # corresponds to the numb...") |
(No difference)
|
Shortcut: Ctrl+Shift+# (where # corresponds to the number of the tool)
A user tool is a way for you to interact with other applications or programs on your system by executing a DOS or Windows command. You can configure up to 50 user tools - 25 standard tools and 25 Project tools. You can access and execute user tools in the Advanced tab in the User tools drop down. You can also add your tools to the ribbon or toolbars and map keyboard shortcuts to your tools. You can also use user tools in macros or scripts.
Clicking Configure tools opens the "Tool configuration" dialog, where you can create and delete tools. Here you can also configure tools, including defining the command line, setting parameters, configuring output handling, and setting options for interacting with the active file.
You can modify existing tools by selecting them from the list at the bottom of the dialog. The dialog also includes the following global buttons for adding / removing tools.
Insert
Creates a new tool and makes it active.
Copy
Creates a copy of the active / selected tool and makes it active.
Delete
Deletes the active / selected tool.
Your changes to tools are not saved until you click either the OK or Apply button in the "Tool configuration" dialog.
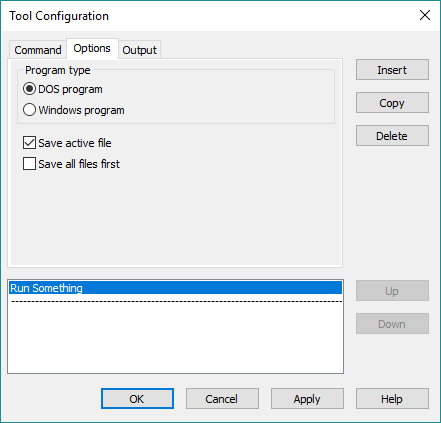
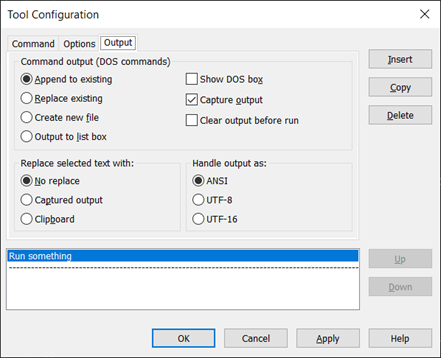
You can configure tools in the Command, Options, and Output tabs in the "Tool configuration" dialog. The settings for each tab are described below.
Menu item name
This is the name of the tool and is shown in the user / project tool drop down as well as the tool list in the "Tool configuration" dialog.
Command line
This is the actual command line to be executed when the tool is run. The command line uses the same syntax as a DOS command prompt, however this field also supports a special placeholder syntax (described below) which allows variables, such as the active file's path and name, to be passed to the command line. You can use the Browse button to browse to and select an existing batch or cmd file.
Working directory
This is the active directory the tool and ensuing process will be launched in. You can use the Browse button to browse to and select an existing folder on your system.
For both the command line and working directory fields, the following placeholders are available.
All examples provided below are based upon a hypothetical file path D:\work\Dev Projects\Cycle One\some file.c.
| Placeholder | Meaning |
|---|---|
| %F | Active file's full path and name (short version) Example: D:\work\DEVPRO~1\CYCLEO~1\SOMEFI~1.C |
| %f | Active file's full path and name (long version). Make sure to encapsulate in quotes if the file path or name might contain spaces. Example: D:\work\Dev Projects\Cycle One\some file.c |
| %P | Active file's full path (short version) Example: D:\work\DEVPRO~1\CYCLEO~1\ |
| %p | Active file's full path (long version). Make sure to encapsulate in quotes if the file path might contain spaces. Example: D:\work\Dev Projects\Cycle One\ |
| %P | Active file's name only (short version) Example: SOMEFI~1 |
| %p | Active file's name only (long version). Make sure to encapsulate in quotes if the name might contain spaces. Example: some file |
| %E | Active file's extension only (short version) Example: .C |
| %e | Active file's extension only (long version). Make sure to encapsulate in quotes if the extension might contain spaces. Example: .c |
| %R | Active project's full path and name (short version), similar to %F above. |
| %r | Active project's full path and name (long version), similar to %f above. Make sure to encapsulate in quotes if the path or name might contain spaces. |
| %RP | Active project's full path (short version), similar to %P above. |
| %rp | Active project's full path (long version), similar to %p above. Make sure to encapsulate in quotes if the project path might contain spaces. |
| %RN | Active project's name (short version), similar to %N above. |
| %rn | Active project's full path (long version), similar to %n above. Make sure to encapsulate in quotes if the project path might contain spaces. |
| %modify% | Using this placeholder will allow you to specify any arbitrary command line argument(s) (in its place) in a dialog prompt when the command is run. |
| %sel% | Selected text. Make sure to encapsulate in quotes if the selection might contain spaces. |
| %Env: | An existing environment variable. The environment variable must immediately follow "%Env:". Note that this placeholder does not require the closing percent sign "%". Example: %Env:TEMP would be replaced with C:\Users\[USERNAME]\AppData\Local\Temp |
| %line% | Current line number in active file (based on first line number of 1) |
| %col% | Current column number in active file (based on first column number of 1) |
Toolbar bitmap/icon (file path)
This field allows you to set the path to a bitmap, png, or icon file to be used in the ribbon, context menu, or toolbar for the tool. Use the Browse button to browse to and select the image file you'd like to use. The image will be scaled to fit in the ribbon or toolbar. If this isn't set, the default tool icon (with associated number) is displayed with the tool.
 Program type
You must define the program type as one of the following two options:
Save active file first
If checked, the active file is saved before the tool is run.
Save all files first
If checked, all open files are saved before the tool is run.
 Command output (DOS commands)
You can optionally capture the output from your DOS command user tool to a file. The four options for DOS command output are:
Replace selected text with
You can choose what to do with the selection in the active file after the user tool is run. This is especially useful if you want to send a selection of text (a code procedure, a forumala, etc.) to an external process and have it reformatted or recalculated in some way. The three options are:
Handle output as
This allows you to specify the encoding to use when displaying the output returned from the DOS command. These options don't actually convert the output, but allow you to configure which encoding UltraEdit / UEStudio uses to display the output. The three options are:
See also: